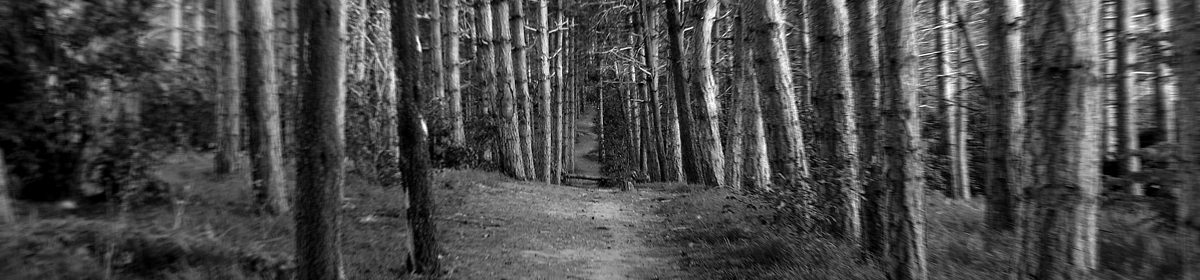
‘Use a combination of wide apertures, long focal lengths and close viewpoints to
take a number of photographs with shallow depth of field. (Remember that smaller f
numbers mean wider apertures.) Try to compose the out-of-focus parts of the picture
together with the main subject. Add one or two unedited sequences, together with
relevant shooting data and an indication of your selects, to your learning log.
Wide apertures create shallow depth of field, especially when combined with a long
focal length and a close viewpoint. In human vision the eye registers out-of-focus
areas as vague or indistinct – we can’t look directly at the blur. But in a photograph,
areas of soft focus can form a large part of the image surface so they need to be
handled with just as much care as the main subject.
Don’t forget that the camera’s viewfinder image is obtained at maximum aperture for
maximum brightness and therefore at the shallowest depth of field. Use the depth of
field preview button to see the actual depth of field at any particular aperture. (This
is especially useful in film cameras where you don’t have the benefit of reviewing a
shot immediately after you’ve taken it). It’s surprising to see the effect that a single f
stop can have on the appearance of an image.’
All images in this series were shot using a Yongnuo 50mm prime lens. Basically a cheap (but effective) copy of the Canon ‘Nifty Fifty’. This equates to 80mm (35mm equiv) on the 1300D’s cropped sensor.
All but the first image were shot using manual focusing.
The camera was mounted on a tripod for all shots.
Example 1


Example 2a


Example 2b


Nothing clever or fancy going on here. I was just playing with the focus point, still marvelling at the shallow depth of field that can be achieved. Just a centimetre or so closer to the lens makes a significant difference to the level of blur on the cables in the background on the lower left.
Example 3a

Example 3b

I moved the focal point fractionally. The first one is focused on the plate just below the front ‘grill’. The second is focused on the ‘plunger’. While the effect this has on the overall look of the dalek, and which parts are in or out of focus, is subtle, it also has an effect on the lighting of the scene. This is most noticeable when you’re able to flick quickly between the two images (Open the enlarged images into separate tabs and then flick between them).
Example 4a

Example 4b
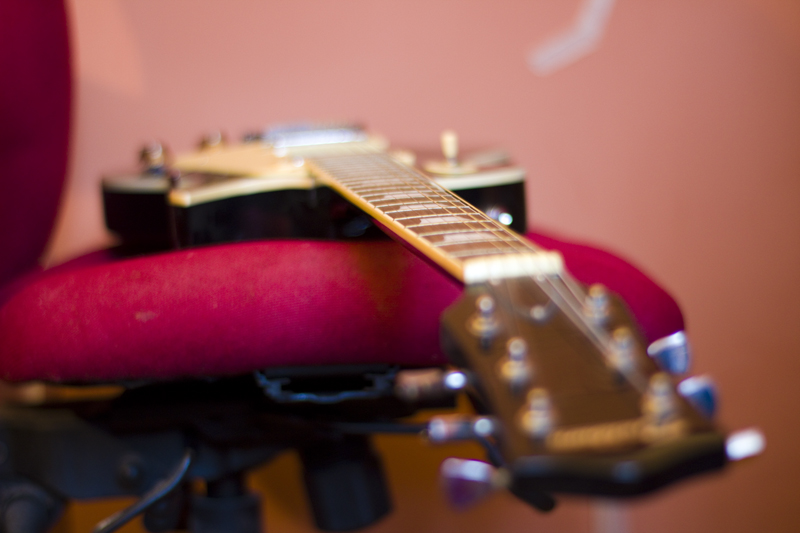
I like the idea behind these images, but the composition suffers due to less than ideal positioning of the guitar, and masking tape stuck on the wall in the background. More time and attention to detail were needed.
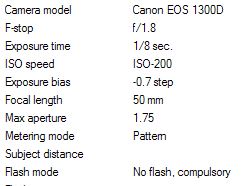
At this point, I realised I was supposed to include images that hadn’t been processed (all of the above have had levels adjusted, though none were cropped or otherwise tinkered with). I also hadn’t tinkered with aperture settings on the above, settling merely to tweak the focal distance slightly. So, with this in mind, the next three images are completely unprocessed, except for resizing, and demonstrate three f-stop settings.
Example 5a


Example 5b

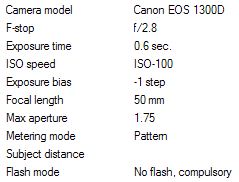
Example 5c


Again, the differences between these images are best seen when flicking through them in sequence. Suffice to say, the difference in depth of field between f1.8 and 3.5, when up close, is significant.
Contact Sheet

Conclusions
In addition to the conclusions I mentioned already, (very small adjustments to close up focal distances have significant effects on blur and lighting, as do changes to aperture)… what really struck me when doing this exercise was the fact that this 50mm (80mm equiv) could shoot objects up close. I had considered it mostly suited to portraits and as a short telephoto for shooting middle distance. It turns out it’s minimum focal distance is 1.5ft.
I also discovered very quickly that trying to take shots like these, indoors and handheld, doesn’t work. There’s not enough light to allow a fast enough shutter speed, so without a tripod, everything comes out blurred.
